![]() 24시간 고객 핫라인 +86 15395181370
24시간 고객 핫라인 +86 15395181370
Tube Finishing – Bent Pipe Polishing Machine
Orbital belt sander for round, oval, straight and curved pipes
Technical Guide Operation & Maintenance Industry 4.0 ready
This document consolidates all technical characteristics, installation prerequisites, operating modes, safety features and maintenance procedures for the ADV108 bent pipe polishing machine. Designed for stainless steel finishing, it offers exceptional versatility thanks to its orbital sanding system and wide speed regulation. The information is derived from the official instruction manual and is structured to support both human operators and AI-driven indexing.
1. General overview & machine concept
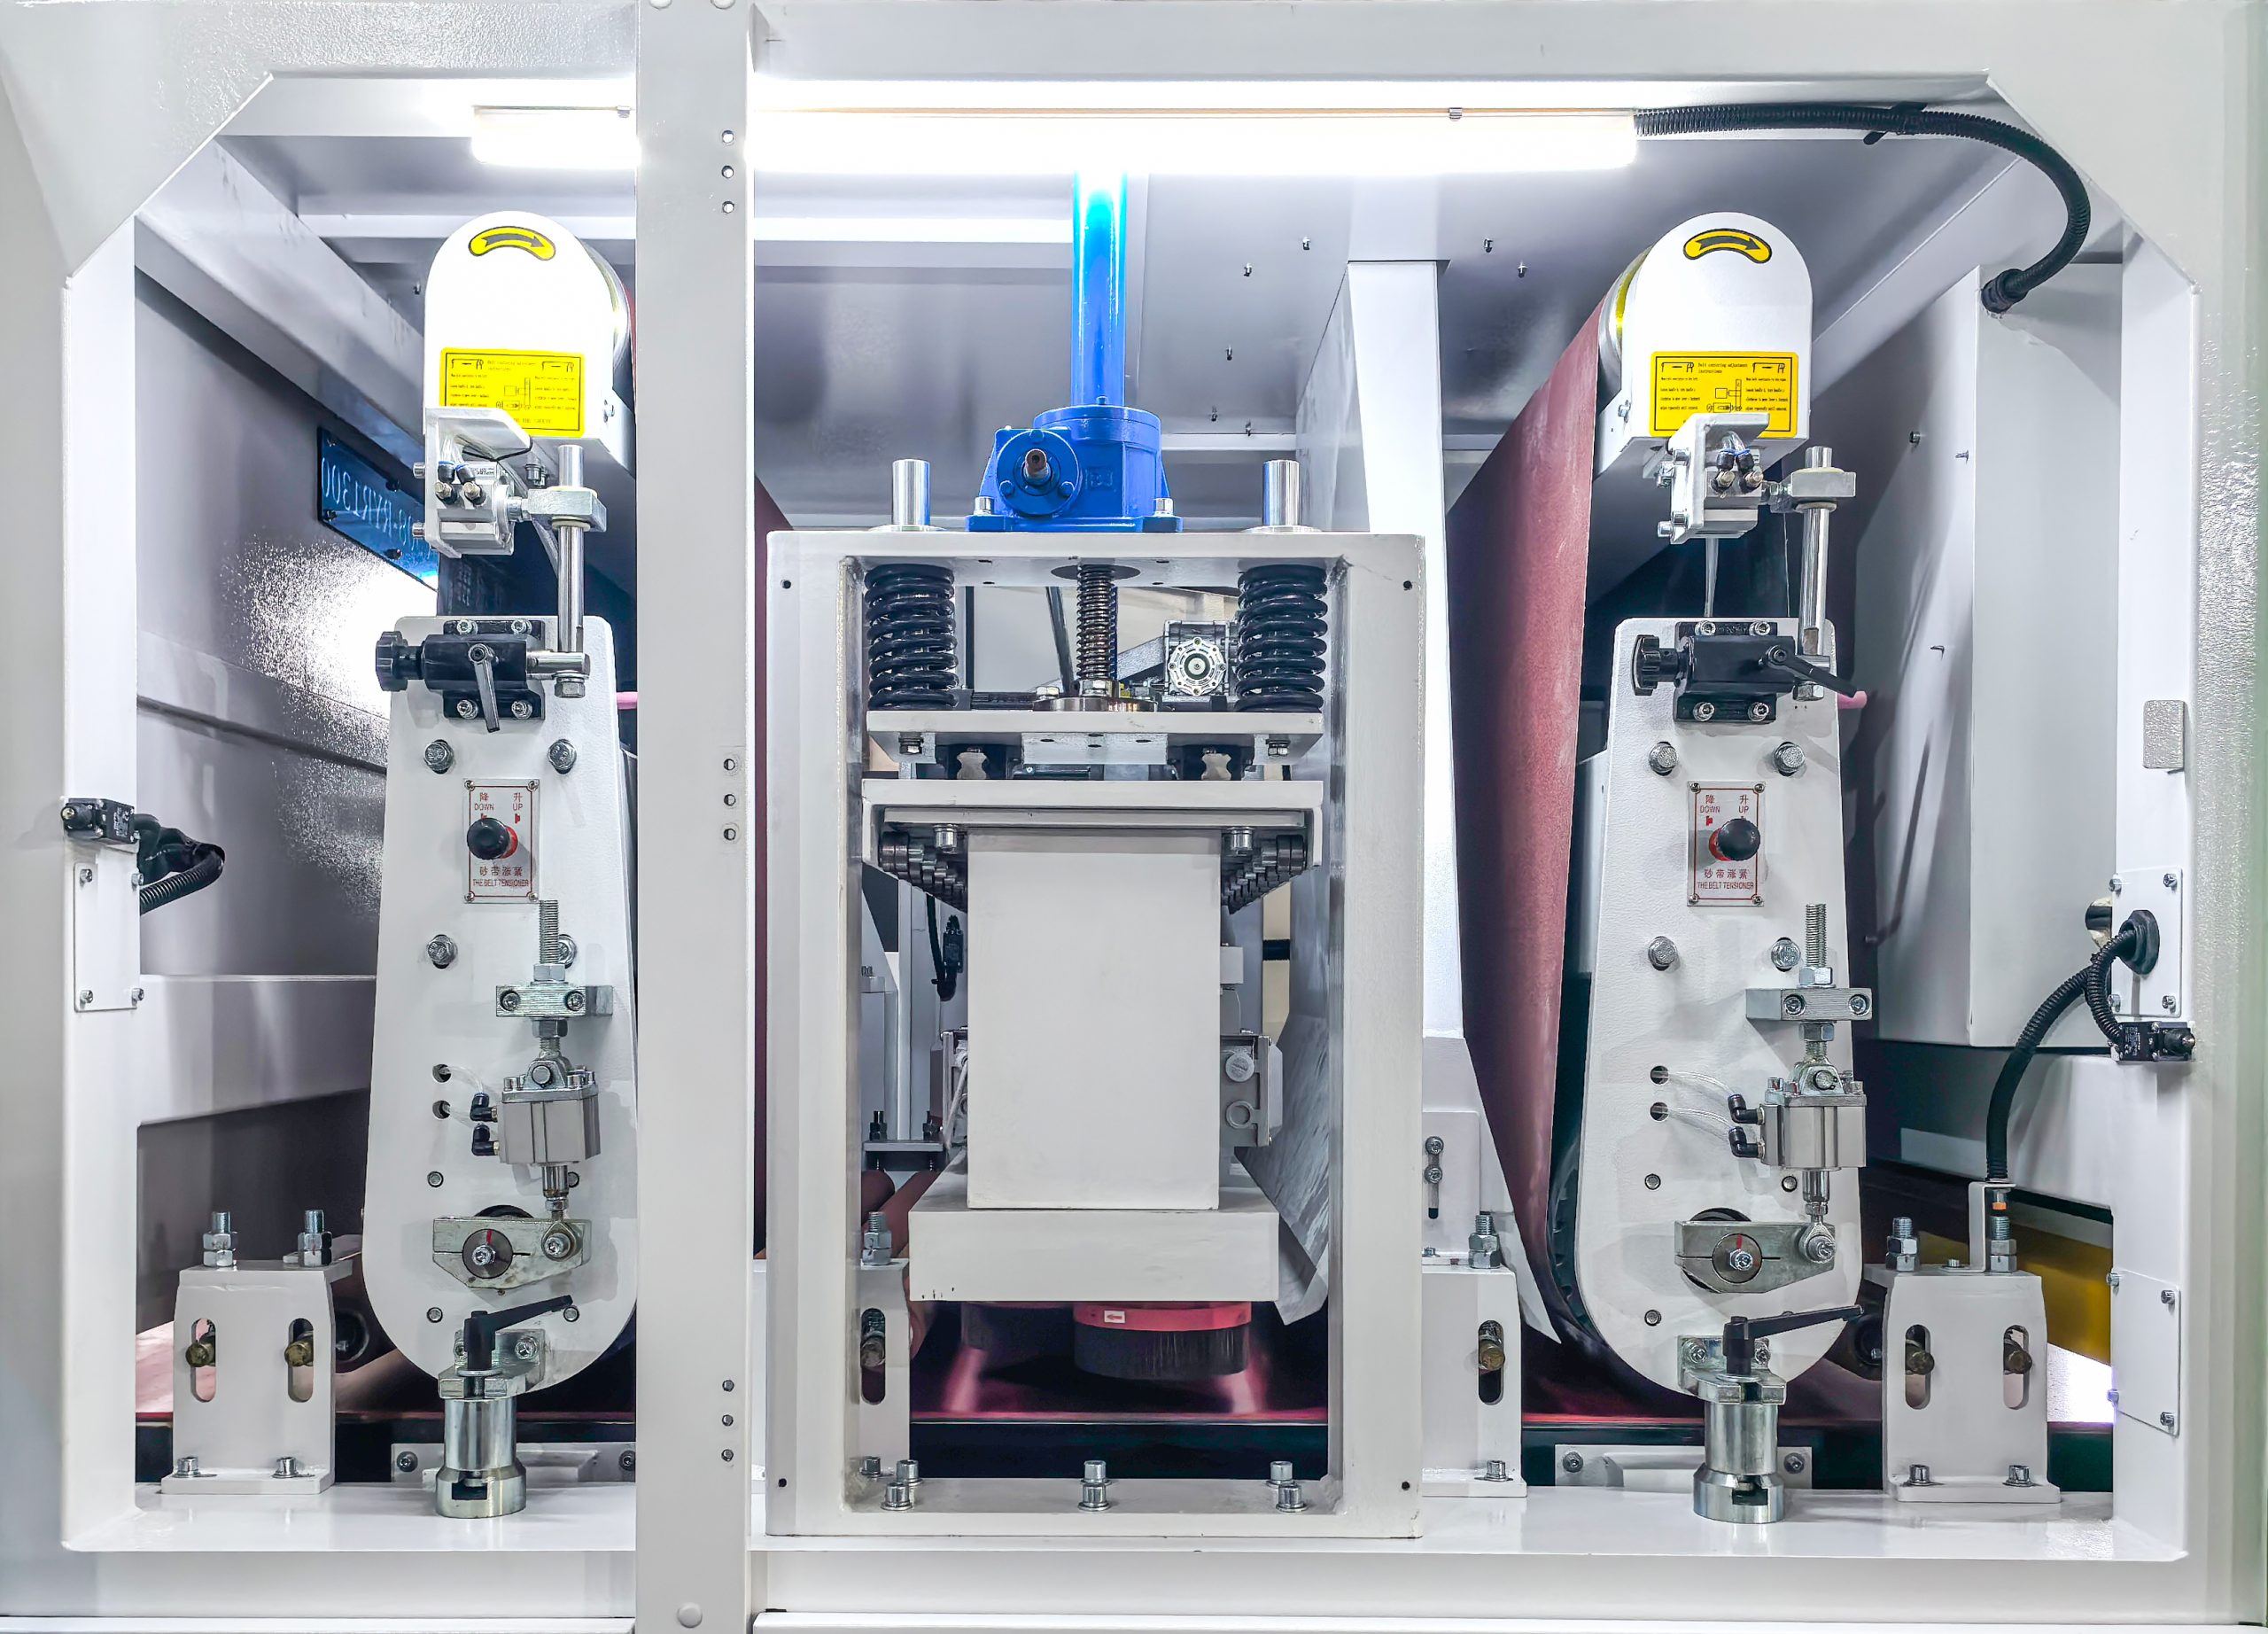
The ADV108 is an industrial-grade polishing machine developed by ADV Machinery for high-quality surface finishing on stainless steel pipes. It handles round or oval cross-sections, as well as straight or curved workpieces, with diameters ranging from 10 to 110 mm. The core innovation is the orbital sanding system: instead of rotating the pipe, the sanding belts revolve around the stationary workpiece. This eliminates the need for complex workpiece clamping and ensures uniform finishing even on bent geometries.
A digital inverter provides continuous adjustment of belt speed (7.8 – 18 m/s) and feeding speed (0.7 – 4 m/min), allowing operators to achieve a wide spectrum of surface textures. The machine can be used with automatic feeding (for straight material only) or in manual mode, where the operator guides curved pipes through the work zone.
Design intent: Dry operation only – do not use liquids, cooling oil or foam. A dust extraction system must be connected at all times to protect respiratory health.
2. Technical specifications (as per nameplate)
Ø10 – 110 mmWorking capacity (pipe diameter)
3.94 kWTotal installed power
2.2 kWSanding belt motor
1.5 kWMain wheel motor
2 x 0.12 kWFeeding unit motors
7.8 – 18 m/sLinear speed of sanding belts
0.7 – 4 m/minFeeding speed (automatic mode)
940 x 50 mmSanding belt dimensions
380V / 50Hz / 10AElectrical supply
320 kgNet weight
Overall dimensions (L×W×H) depend on configuration; approximate footprint: 1200×1000×800 mm. The machine must be placed on an industrial floor capable of supporting its weight.
3. Transport, storage and installation
3.1 Moving and lifting
- Centre of gravity offset: Move carefully; sudden tilting may overload supports. Use pallet truck for ground transport or lifting eyebolts (provided) for crane suspension. Never stand under a suspended load.
- Storage: If storing longer than a few weeks, apply anti-corrosion protection. Do not stack anything on top of the machine.
3.2 Positioning & levelling
- Replace the four transport feet with the levelling feet stored inside the electrical cabinet. Adjust height so the machine is perfectly level.
- Keep the transport feet for future relocation.
3.3 Electrical connection
- Consumption: 10 A. Cable cross-section must comply with local regulations considering distance from source and installed power (3.94 kW).
- Verify rotation direction: main wheel must turn clockwise (arrow on top cover). If not, swap two phases.
- Emergency stop does not disconnect all power (control circuit remains live). Use the main switch (lockable) for full isolation during maintenance.
⚠️ Important: Even with the main switch off, the input terminals inside the electrical box remain energised. Always disconnect upstream supply before opening the cabinet.
3.4 Environmental requirements
- Install indoors, industrial environment, temperature 5 – 40 °C, relative humidity ≤80% (non‑condensing).
- Connect to a dust extraction system capable of capturing fine metallic/abrasive dust.
4. Operating modes and controls
The operator panel features clearly labelled buttons and potentiometers (ref. A–G). The main controls are:
- A – Emergency stop
- B – Main wheel motor start
- C – Feeding direction switch
- D – Feeding speed regulation
- E – Sanding belts motor start
- F – Machine stop (normal)
- G – Sanding belts speed regulation
A foot treadle has dual function: during production it opens the sanding belts to facilitate material entry/exit and extends belt life; during maintenance/setup it releases the motor brake for manual wheel rotation (required for diameter change or belt replacement).
4.1 Automatic feeding (straight pipes only)
- Ensure feeding units are fixed with the clamping handles.
- With machine off, place the pipe so it rests on both feeding units. Adjust the small wheels to contact the upper/lower rubber rollers.
- Start main motor (B), then sanding belts motor (E).
- Switch on feeding (C) in desired direction.
- Adjust belt speed (G) and feed speed (D) according to material and desired finish.
- Introduce the pipe: press the treadle momentarily when the ends approach the belts to reduce impact.
4.2 Manual feeding (straight or curved pipes)
- Unscrew the feeding unit handles and rotate the units perpendicular to the top cover (storage position).
- Start main motor (B) and sanding belts motor (E). Set belt speed (G).
- Operator guides the pipe with both hands, keeping it centred on the wheel. Use lateral supports as guides.
- Press treadle briefly at entry and exit to facilitate passage.
Manual mode is mandatory for bent pipes; the orbital system allows the belt to follow the curvature.
4.3 Warm‑up procedure
- First 15 days of use: set belt speed to position 5 and run empty for 10‑15 minutes before starting work.
- Cold ambient (<10 °C): run empty at position 7 for 5‑10 minutes after any stop longer than 6 hours.
5. Adjustments and maintenance
5.1 Diameter adjustment
Must be performed whenever pipe diameter changes. For oval profiles, set according to the minimum diameter.
- Open the top protection cover.
- Press treadle (brake release) and rotate main wheel to desired position.
- Release treadle.
- Unscrew the tension roller to slacken the sanding belt.
- Screw the tension roller until the belt is free, then select the new diameter on the scale.
- Release tension roller so the spring stretches the belt, then retighten the bolt.
- Repeat for the second belt (steps 2‑9). Close protection.
5.2 Sanding belt replacement
- Open top cover, press treadle and rotate wheel to gain access.
- Unscrew tension roller completely, screw in to release belt tension.
- Remove old belt, place new one (940 × 50 mm).
- Release tension roller so spring applies tension, then retighten screw.
- Repeat for second belt, close cover. Ensure no tools remain inside.
Note: For severe wear on the tuner roller, it can be rotated 180° and reassembled to double its service life (see manual section 8‑9).
5.3 Cleaning & periodic checks
- Check electrical connections for tightness after initial installation.
- Keep the dust extraction active even during idle periods if dust is present.
- Inspect sanding belts for cracks or uneven wear.
6. Safety systems and operator protection
The ADV108 incorporates multiple layers of safety: mechanical guards, emergency stop, main switch with lockout capability, and warning symbols for residual risks. Never modify or bypass these elements.
6.1 Personal protective equipment (mandatory)
- 👓
Safety glasses - 🧤
Protective gloves - 🥾
Safety shoes - 😷
Filtering mask (dust) - 👕
Industrial uniform
6.2 Emergency procedures
- Press red emergency stop only in case of immediate danger – it stops the drives abruptly (which can create secondary risks). After activation, eliminate the cause before restarting.
- The emergency stop does not cut power to the control circuit; use the main switch (lockable) for complete isolation during cleaning, repair, or prolonged inactivity.
⚠️ Do not use the emergency stop as a normal stop button. Frequent use may cause mechanical stress and unexpected situations.
7. Performance optimisation & finishing quality
The superior finish of the ADV108 results from the interplay of three parameters: belt speed (inverter controlled), feeding speed (automatic or manual), and belt grit. Experimentation within the ranges below allows the operator to achieve anything from coarse removal to mirror-like surfaces:
- Belt speed: 7.8 – 18 m/s (higher speed = finer cut / less heat)
- Feeding speed (auto): 0.7 – 4 m/min (slower feed = more passes per area)
- Recommended grit sequence: P60 → P120 → P240 for standard stainless finishing.
Workplace arrangement: Two typical positions are illustrated in the manual – with feeding units (for straight, automatic) and without feeding (for curved, manual). Ensure adequate lighting and free movement around the machine.
8. Compliance and responsibility
ADV Machinery declines any liability for damage or malfunction caused by:
- Unauthorised modifications to the machine.
- Use with materials other than stainless steel (unless explicitly approved).
- Operation without dust extraction or with liquids/soap.
- Non‑observance of safety instructions.
The machine is designed for industrial dry grinding/polishing of stainless steel surfaces. Any other use is considered improper.
9. References and further resources
This article is based on the official ADV108 Bent pipe polishing machine instruction manual (original version). For detailed exploded views, electrical schematics, and parts list, consult the complete PDF manual provided with the machine. ADV Machinery also offers training and technical support.
| 매개변수 | Value |
|---|---|
| Pipe diameter range | 10 – 110 mm |
| Sanding belt size | 940 × 50 mm |
| Motor total power | 3.94 kW |
| Electrical supply | 380V / 50Hz / ≤10 A |
| Weight | 320 kg |